

Showing posts with label food. Show all posts
Showing posts with label food. Show all posts
Wednesday, May 11, 2016
Eliza's Cherry Trees: a Cotton Candy Craft
Monday, June 4, 2012
Using Rubber Stamps on Cookie Dough


- deeper, simpler stamps are better
- you don't want to press down too hard because then the corners of the stamp show up
- you don't want to press too lightly because then the outline of the picture is indiscernible
- even when you are as careful as possible, the picture often fades away in the oven. Only about a third of ours turned out.
I love that the girls were completely unaware of its having been an aesthetic flop. To them, it was just like playing with sweet playdoh. They especially liked using our pawprint stamps on the doh, and they enjoyed painting the cookies afterward with diluted food dye.

Sunday, May 6, 2012
Gardening with Kids: Rainbow Chard
We don't garden to save money or to enjoy fresh, organic produce (actually, last year we lost money on our garden, and didn't get that much produce, but I'm still glad we did it). Our family gardens mainly for the pure joy of it. If you've ever had a garden then you know how miraculous it feels to see seeds you planted sprout and the thrill of eating food you planted and tended yourself.
 Because we're in it mainly for the experience, I'm always on the look-out for things we can grow that will be especially fun for kids. I've written about the multi-colored carrots we've grown. When the kids dig up the greens, they don't know until they get there whether it will be a yellow, purple, or orange carrot dangling from the other end. This year we're growing purple snap beans that turn green when you cook them.
Today, I wanted to show you another fun thing we've got in our garden right now. For the past two years, we've had really good success growing chard. Unlike most things, it really flourishes in this dry, Texas heat, and the stuff is chock-full of vitamins. This year though, instead of regular green and white chard, we're growing Bright Lights, a kind of chard with multi-colored stems.
It's also delicious roasted with onions and feta cheese. When we prepare it this way, first, we chop the stems, toss them with olive oil and a chopped onion, and roast them at 350 degrees for about 15 minutes.

Then we add the chopped chard leaves; sprinkle them with feta cheese and return to the oven until the feta is a little melted. Really, really good.


Today, I wanted to show you another fun thing we've got in our garden right now. For the past two years, we've had really good success growing chard. Unlike most things, it really flourishes in this dry, Texas heat, and the stuff is chock-full of vitamins. This year though, instead of regular green and white chard, we're growing Bright Lights, a kind of chard with multi-colored stems.
Rainbow Chard in the Kitchen
Chard can be chopped up and included in salads for a really pretty touch (especially the smaller leaves; once they get large they tend to be a little more bitter).It's also delicious roasted with onions and feta cheese. When we prepare it this way, first, we chop the stems, toss them with olive oil and a chopped onion, and roast them at 350 degrees for about 15 minutes.


Tuesday, May 1, 2012
Gardening with Kids: Magic Beans!
We just had our first harvest of green beans...which is all very normal except that they weren't green! They were burgundy until we cooked them, and then they turned green. The kids loved it, and they were delicious.

The beans are called Royal Burgundy and are sold by Botanical Interest
Tuesday, April 17, 2012
Fun Lunch Idea: A Shell for a Spoon


Thursday, February 23, 2012
Alphabet Pancakes

Monday, February 6, 2012
Rose Boba Milk

Here's a fun way to make drinking milk more appealing to your kids- add Boba, that is, pearl tapioca. Boba tea (a sweet drink with tapioca balls at the bottom) is a popular drink in many Asian countries. I made my boba with rosewater for a unique taste and red food dye to make it even prettier.
To make the Boba:
1. Use a ratio of 8 to 1, water to tapioca pearls. Add a generous splashing of rose water and food dye (depending on taste)
2. Boil water
3. Add tapioca, and boil for 15 minutes with cover on the pot.
4. Turn the heat off and soak for another 15 minutes
5. Rinse the pearls and drain off the water
6. Store in sugar syrup until ready to use.

I added some silk flowers I happened to have around to the stem of a pretty cup to make it seem extra special. You might want to warn your kids ahead of time though that the Boba are not going to be as sweet as they might be hoping. I think mine were a little disappointed to find out they weren't candy!

Wednesday, February 1, 2012

Monday, January 30, 2012
Snowflake Pancakes

We started yesterday morning. In fact, we were almost late for church because the girls and I got completely carried away making these snowflake pancakes. (sadly, we barely had time to eat them!)

I found a mostly-empty squirt bottle of ketchup in the back of my refrigerator (yes, I do believe I could find just about anything in there). After pouring the remaining ketchup into another bottle and scrubbing it out, I used a funnel to fill the empty squirt bottle with pancake batter. Now I had a writing instrument for drawing whatever I liked!
It was a little tricky to draw pretty snowflakes for two reasons:

1. Snowflakes really only look believable if they are symmetrical- a little tricky when drawing with batter
2. I used a recipe for crepe batter instead of the traditional pancake batter with baking powder, etc. I thought the snowflakes might be prettier if the pancakes were flat, but crepe batter is very thin and runny. If you're not careful, you'll end up with a simple little pool of batter instead of a snowflake.


Monday, January 23, 2012
Heart-Shaped Foods- Part I
Well, I don't know about you, but after almost a month after Christmas I'm finally ready to begin thinking about another holiday. Valentine's Day can be awfully cute and fun for kids. The only problem tends to be all the candy that tend to accompany it. One fun way around all the Dove promises and sweet tarts is to find ways to slip hearts into every day food.
 1. These cherry tomato hearts are simple and adorable.
2. Use a squirt bottle full of pancake batter to make these lacy heart pancakes.
3. My sister made this heart pepperoni pizza three years ago. Isn't it cute?
4. Heart-shaped egg and toast from Martha Stewart to serve your sweetheart or little sweeties for breakfast.
I've been collecting simple ideas for heart-shaped foods for quite a while so you can expect to see a few more posts on this theme in the next few weeks.
What other ideas has your family tried for celebrating Valentine's Day in a low-candy way?
Thursday, January 5, 2012
Fun with Finger Jello


We made four colors- for each color we used 2 packages of jello combined with 2 1/2 cups boiling water (no cold water) and poured it into an 9x13 pan. (The girls were able to do all the stirring) Once the jello had set (about 3 hours) the girls used cookie cutters to cut out letters and shapes. (I had to be the one to lift them out of the pan with a spatula though)

We used the scraps around the cookie cutters to make rainbow parfaits (layered the colors)

Friday, December 23, 2011
Festive Mini Pretzel Rods

1. First we crushed candy canes in a ziploc bag with a heavy rolling pin. (The girls enjoyed doing this part, but needed quite a bit of help to get the pieces small enough.


3. Next we dipped small pretzel rods into the white chocolate and sprinkled them with the candy cane pieces. (This part was very fun for the girls too, but they needed some help making sure they let the excess chocolate drip off before they rolled them.
4. Set to dry on a piece of wax paper. (Only takes about 10 minutes)

(Yes, M has a tin bucket on her head. Not sure why :-)
For our packaging, we tried a cute idea I saw on Pinterest a while back. We just used small ziploc bags and stapled some holiday scrapbook paper on the top. They turned out cute and tasty- the girls were proud to stick them in the mailbox.
Monday, December 12, 2011
Family Evening with Pomegranates
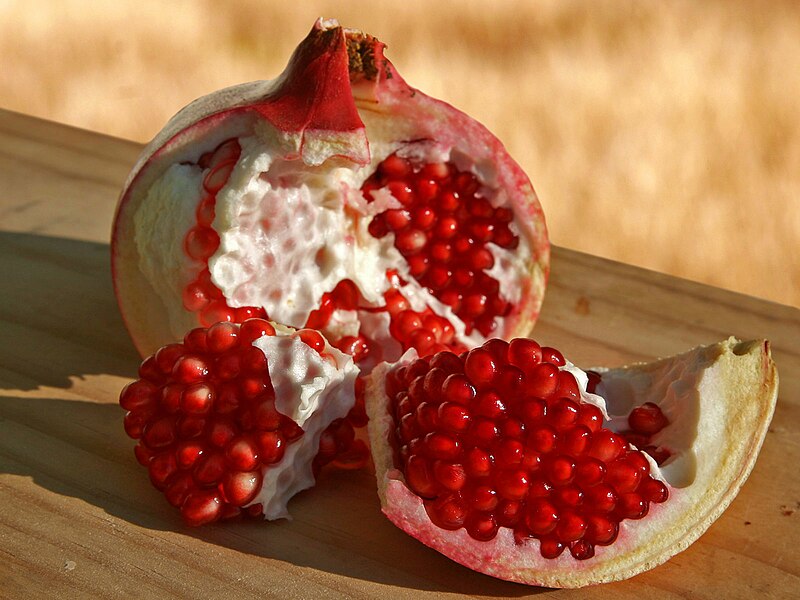
For both methods, you cut the pomegranate in half. Then you either
1. Pull each half apart into large pieces and submerge in water. Little fingers can easily pull off the seeds this way.

or
2. Turn each half upside down and whack with a heavy spoon so that the seeds fall off into a bowl. Also fun!


Monday, December 5, 2011
Gingerbread Day

This year they are displaying replicas of Austin landmarks. We even got to see a gingerbread version of the hospital where I'll be delivering little baby J in a week or two.

It was fun to look, but I realized that the whole experience was a bit of a tease for the girls when M turned to me and said, "NOW, can we eat them?"
Thankfully, I had previously
The bulk candy aisles were particularly fun because we were able to purchase just a few pieces of a big variety of little candies.

While the girls napped, I set to work constructing the graham cracker houses. The site from Pinterest really has amazingly good and detailed instructions. I was especially thankful for her suggestion to use melted chocolate instead of the royal icing I would have used as a default. Royal icing takes a lot longer to dry and so leaves the little house pretty susceptible to collapse for a couple of hours. The melted chocolate dried quickly and solid.
The only real trouble I had was in making sure I had enough graham crackers. When I opened the package I found that half of the crackers were broken. (may have had something to do with the fact that little G was in the basket with them at the grocery store) In the end, I was able to salvage enough for two little houses.


I think it might be fun to host a gingerbread house decorating party next year. Have any of you done that? Any tips? Any fun books to go along with the activity? (I considered Hansel and Gretel, but the part about throwing the witch into the oven always makes it a bit of a disturbing story to me :-)
It would be great to get other suggestions!
Wednesday, November 30, 2011
Nutrition Treasure Hunt


WFMW
Tuesday, November 22, 2011
Making Our Kitchen Smell Like Delicious Fall

1. The wonderful, cozy autumn smell in our house as we baked them
2. The fun the girls had in making them
or
3. The delicious, crispy crust and warm, sweet gooeyness inside
All in all a great (and easy) fall project!

Materials:
apples
butter
cinnamon sugar
pie crust (I made my own because I'm cheap, but store-bought would be an easy alternative)
egg white (optional for making a shiny glaze on the outside)
What To Do:
1. Peel and core some apples.
2. Place each apple on a swatch of pie crust big enough to wrap the apple.
3. Let each child stuff their apple with bits of cold butter and cinnamon sugar.


6. Bake on a greased, tin foiled baking sheet at 350 degrees for 40-45 minutes.
Yum! Like tasty little apple pies! My husband loved them too!
Tuesday, November 1, 2011
We Made Butter!


Heavy cream (the higher the fat content the better)
Jar or tupperware container for shaking (smaller containers= less time shaking) I used a salad dressing shaker because it was easy for little hands to hold while they shook
Marbles (optional, to aid the mixing process)

Fill the jar half-way up with the heavy cream, drop in the marbles and shake, shake, shake. You don't have to be super vigorous; just keep it moving.

Drain the buttermilk off of the butter and reserve for pancakes or something else delicious.
You'll be left with a soft, spreadable butter- slightly wetter than what you would buy in the store.
The Verdict
So...it DID take a long time. The five kids shaking it had worn themselves out before it was done; so the adults finished it up. Altogether, it took about 20 minutes of shaking for the butter to form.

If you're on the line about doing this activity yourself, my advice is that it is worth it, but be ready for a good arm workout!
Works for Me Wednesday!
Subscribe to:
Posts (Atom)