You know what I recommend? Trial runs for homemade Valentines Day treats! Ha ha...why not- right? We did that the other day with these heart-shaped granola bars as I wasn't sure how granola dough would work with cookie cutters. I'm happy to report that it works just fine (said through tasty granola crumbs).
I vote for making these above actual heart-shaped sugar cookies for the following reasons:
Showing posts with label young children. Show all posts
Thursday, January 23, 2014
Friday, March 15, 2013
My Kids Love it When I do Laundry!
Yes, my girls get pretty happy when they see me with a basket of clean laundry. Do they care that much about clean socks and underwear? They couldn't care less! What they love is the prospect of being showered with piles and piles of clean clothes. (It's especially great if I am on the ball about getting it out of the dryer in time, and the clothes are nice and warm)
And why not? It all needs to be folded and sorted anyway. They sit close together and wait for me to dump it all on their heads. Lots of giggles. No creativity, time or clean-up required on my part. Perfect.
This post is inspired by my friend Rebekah at The Golden Gleam who writes a fun series called Joy in Minutes with lots of easy, simple ways to bring joy to your family.
Monday, December 17, 2012
Christmas Lanterns from Baby Food Jars
Throwing away babyfood jars is something I like to avoid when I can. They are a nice size and really so pretty without their paper. MaryAnn F. Kohl has a brilliant craft idea for them in her book Scribble Art. I did this project with a group of 3 and 4 year- olds and several of the lanterns turned out very pretty.
We covered the jars with tissue paper and mod podge. I cut letters out of black construction paper for the kids to glue on to make them more Christmas-y. (I had intentions of making a "love" lantern and a "peace" lantern as well, but haven't quite gotten around to those yet)
Mod Podge is non-flamable; so you could fill the lanterns with regular candles, but for kids' projects I really love the battery- operated tealight candles you can buy now. They are safe and pretty convincing.
Any other fun ideas for reusing baby food jars? (especially Christmas related would be fun!)
Labels:
christmas,
crafts,
holidays,
young children
Wednesday, November 14, 2012
Leaf Printing for Fall
Before Fall slipped away entirely I wanted to share this project I did with my girls a while back. Leaf printing on paper is an idea I found in MaryAnn Kohl's fun book Scribble Art. She recommends using thin paper, but since all my paper was thick and stiff, I decided to try using some old muslin I had left over from another project.
I liked the earthy way the muslin looks behind the prints. I used watercolor paint because I don't have an intention of washing it, but I think fabric paint would work as well.
Here are some tips I found for making good prints:
- Use sturdy, durable leaves with pronounced veins. I used white oak.
- Make sure the paint covers the leaf entirely but is not too thick or globby
- Press down the fabric on top of the leaf (instead of the other way around)
- The second print is often the nicest; so try blotting on scrap fabric before printing on the fabric you hope to use
M has been wanting to learn to sew lately; so I think we may turn these into some simple, small pillows.
For more fall project ideas for places without "real" fall leaves see our Fall Stained Glass craft, and painted toast leaves.
Tuesday, October 16, 2012
Waterbeads and Marbles Fishing Game
Have your kids played with waterbeads yet? They are really the neatest things. You can find them in the floral department of craftstores or even Walmart or the Dollar Store. Waterbeads start off as tiny seed-like balls and expand dramatically as they soak in water.
Kids love the feel of them in their hands, and lots of people have written about ideas for playing with them. Teach Preschool has a very fun list with lots of inspiration.
For M and G's birthday we filled a large tub full of them, added some water and threw in several dozen glass and plastic marbles. Since it was a rainbow fish birthday theme we thought it would be fun to turn it into a fishing game. Each child took a turn with a blindfold and had a minute to pick out as many marbles as they could.
It was harder than it looked! The plastic marbles floated, and the glass marbles sunk; so contestants were free to find the method of sorting that worked best for them. Any waterbeads that ended up in the fishing bucket counted as negative points.
We had some competitive kids. They played over and over, beating each other's scores for over an hour and a half. (My poor husband was such a trooper in overseeing the game for that long!)
The next day, M, G, and I had bonus fun throwing the waterbeads at each other. We found them to be terrific ammunition as they are soft, bouncy, and wet.
Labels:
games,
outdoor activities,
sensory tub,
summer,
water fun,
young children
Thursday, September 20, 2012
MaryAnn F. Kohl: Art with Young Children and a Giveaway
It's a treat to be able to interview someone you admire who is an expert in a field you care about. That's why, even though this is a busy season in my life, I couldn't pass up the opportunity to interview MaryAnn F. Kohl, author of over 20 award-winning books about children's art and a contributor to Family Fun magazine (among many other distinctions).
MaryAnn recently sent me a copy of 
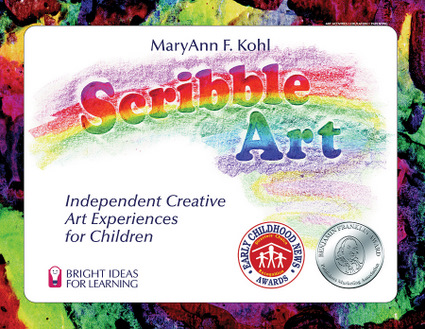
Scribble Art to review, and the girls and I have been having a ball trying out the activities there. So far, we've done salt painting, made an easy piñata, and tried tissue paper collages (my favorite so far!)
The thing I love about MaryAnn's books is her obvious and genuine care for children. It is tempting as a parent or a teacher to gravitate toward art projects that "turn out well," with end-products that make adults feel that the time has been worthwhile. MaryAnn, on the other hand, sees art from the perspective of a child and knows that it is the creative exploration that is often very special to children. That's why in Scribble Art, you'll find oodles of ideas for open-ended art experiences.
Who knew that there were so many possibilities for art mediums and canvases around the house? Liquid starch, flour, sawdust- even insulated telephone cable find their way into over 100 activities that children can do independently for the sake of fun and beauty.
I'm finding it can be a great boon to have this arsenal of fun lying about the house, by the way. The other day, as I was making dinner and needed to work uninterrupted, I found the tissue paper collages to do the trick nicely!
So let's turn now to MaryAnn and hear her perspective on doing art with young children.
Scribble Art was the first book I wrote, and has sentimental connections back to my teaching years where all these ideas were tested with kindergarten through grade three children, children I knew and loved. I choose these projects because they were open-ended and I was so excited to write a book to encourage creativity for children where their own unique artwork rather than copying adult made cutesy projects. The book was published in 1985 and it is still my favorite and still selling well around the world (in 9 languages no less).
Preschool Art is the best book for the 2-5 year old group, but it costs more than Scribble Art, and Scribble Art would do very well for that group too. My website also offers reduced price eBooks, which is another option.
MaryAnn has such a gentle touch in her thinking about children and mothering. Wouldn't you loved to have had her for a teacher (or a mom-coach :)? To hear more of MaryAnn's kind voice take a look at the beautiful interview that Tinkerlab did recently.
*********************************************************************************
MaryAnn has graciously offered to give a copy of her book Mudworks (the bilingual edition) to one reader here at Having Fun at Home. To be entered in the giveaway, take a look at MaryAnn's website Brightring and leave a comment on this post about something you saw there. (make sure to leave an email address so I can contact you if you win)
For additional entries,
1) Like MaryAnn's Facebook page.
2) Like Having Fun at Home's Facebook page
Leave an extra comment for each of the above.
The giveaway will close at midnight on October 1st. At that time I will chose a winner using Random.org
Update: Giveaway closed. Winner is #21 Jennifer!
The thing I love about MaryAnn's books is her obvious and genuine care for children. It is tempting as a parent or a teacher to gravitate toward art projects that "turn out well," with end-products that make adults feel that the time has been worthwhile. MaryAnn, on the other hand, sees art from the perspective of a child and knows that it is the creative exploration that is often very special to children. That's why in Scribble Art, you'll find oodles of ideas for open-ended art experiences.

I'm finding it can be a great boon to have this arsenal of fun lying about the house, by the way. The other day, as I was making dinner and needed to work uninterrupted, I found the tissue paper collages to do the trick nicely!
So let's turn now to MaryAnn and hear her perspective on doing art with young children.
1. Can you tell us a little about the role art has played in your own life personally, both as a child and an adult?
When I was little, I was constantly coloring in coloring books and on blank paper, and at times, on the walls. My mom provided me with scissors, glue, paper, and wonderful crayons all at my reach on a shelf we called the coloring shelf. As I grew, I had some talent with drawing, though I was never super talented, but I enjoyed it enough that I was often complimented on my work. This encouraged me to volunteer to do covers for classroom books or decorate invitations for the Halloween Party. When I began teaching, I found that even the most rowdy child would quiet down and become focused when doing art, and by art, I mean actually creating unique work with materials on hand, not copying something I the teacher had made. So I made sure art was a big part of everything we did. When I had my own kids, art was important from the beginning. Playdough, painting, coloring, and collage were a constant for my kids. They are both very good at art now, and though I don't think it is because of all the activities we had specifically, I do believe that their creativity was honored which has inspired them to go forward in life with that ability.
2. Each of your books makes a unique contribution. What about Scribble Art do you especially like?
3. What tips would you give parents for doing art with very young children?
Start small! Rather than putting out jars of paint for a painting project, start with some shallow jar lids filled with about 1/8" of paint, perhaps three colors tops. Use small brushes or cotton buds for beginning. On the other hand, using big brushes and a bucket of water outdoors will paint thousands of rocks and squares in a sidewalk. Big or small, messy or tidy, start with fewer materials in the beginning, and add more in as the children become adept at using them and learn to handle the wonder of it all.
4. As a mother, I often feel my blood pressure rise when art starts to get messy because I envision myself spending the rest of the day cleaning it up. I would love to hear about how you dealt with the tension between creative art and cleaning up messes when you were a parent of young children.
Do messy type art on days you are ready to handle it. Otherwise, skip it for the time being. The smartest thing is to set up the art area ahead of time to catch the mess. For example, tape an old shower curtain to the floor or over a wall near their little work table, or keep a damp sponge on their work area for them to wipe their fingers; wear a fitted apron or cover rather than a big shirt with rolled up sleeves that get in the way. Plan ahead to prevent problems. Sometimes I put a loop of masking tape on the bottom of a paint cup so it won't tip over, or certainly only fill it half way, not to the brim. Ideas like this make things easier. And if possible, working outdoors is always nice and much easier to clean up. Encourage the kids to help with the clean up too. Part of being a child and being given wonderful experiences is to participate in setting up, mixing, cleaning up, etc. They love to wash the tables with a big soapy sponge!
5. Would you also give us some tips on doing open-ended art with young children in a group setting?
I like to place materials on the center of a table that everyone can gather 'round together (usually no more than 6 at the table at a time). Everyone can reach in and use what is available, and everyone cleans up their own mess. I rarely show them any finished product they should be trying to achieve; I would rather just see what they do with the materials. Most materials shout out how they should be used, so you don't have to say much. For example, if you have contact paper peeled away and sticky, and there are cotton balls and scraps of paper on the table, the kids will automatically stick the cotton balls and scraps to the sticky background. Let the materials you choose dictate how the activity will go. Sometimes you need to give a little demo or a brief explanation so they aren't left completely in the dark with new or unusual materials. But try not to make a sampale for them to copy, because they will copy it, and at that point, the whole purpose of creativity and unique thinking has gone out the window.
6. Which of your books / activities do you especially recommend for the youngest crowd? (2 to 5 year olds)
7. Is there anything else you would like to add?
I would love for everyone who is interested to join my mailing list. I send out a very nice newsletter once a month called the ArtsyKidsNEWS, with four or five art projects that go well with that particular month. Halloween/Autumn/Harvest is coming up soon and will be sent by email, free of course, at the end of September. Each month one person wins a free art book! Sign up on my website, home page, lower right corner:
I'd love for your readers to visit my Facebook page too.
Go here:
or go here:
MaryAnn has such a gentle touch in her thinking about children and mothering. Wouldn't you loved to have had her for a teacher (or a mom-coach :)? To hear more of MaryAnn's kind voice take a look at the beautiful interview that Tinkerlab did recently.
For additional entries,
1) Like MaryAnn's Facebook page.
2) Like Having Fun at Home's Facebook page
Leave an extra comment for each of the above.
The giveaway will close at midnight on October 1st. At that time I will chose a winner using Random.org
Update: Giveaway closed. Winner is #21 Jennifer!
Thursday, August 30, 2012
Invitation to Blow Bubbles
This set-up was part of the girls' joint birthday party that we had the other day . We filled the sandbox with homemade bubble solution (corn syrup helps the bubbles to not pop as easily).
The bubbles kept some of the kids busy while others played the one and only party game (more about that later!)
Labels:
outdoor activities,
summer,
toddlers,
water fun,
young children
Tuesday, August 14, 2012
Spray Away Chalk Letters
We use spray bottles a lot around our house. Most often we use them to help de-tangle and de-frizz our curly haired girls. (we also use them to spray out wrinkles because we hate to iron!)
One problem though...spray bottles are just too fun. It's hard for little girls to resist spraying them all around the house.
The last time one of them gave the playroom floor a good soaking and caused the other one to slip and go flying I inwardly vowed that I was going to find some fun outlets for spray bottle spray that wouldn't make me grumpy.
For our first non-grumpy spray bottle activity, I tried a simple literacy idea. G is often better at telling me the sounds that a letter makes than remembering its name.
So for a little review, I wrote out the letters of the alphabet in chalk on our back patio and gave the girls each a spray bottle. When it was their turn, I named a letter and their job was to find and spray it away. We went back and forth until all the letters were erased.
Simple, fun, and no grumpy mom at the end= what I was shooting for.
Do you have any more spray bottle ideas for us that fit this equation?
Labels:
education,
outdoor activities,
toddlers,
water fun,
young children
Wednesday, August 8, 2012
Travel Game: I Spy Treasure Bags
Well, we're back. We lived a crazy three weeks visiting lots of relatives and friends up North, and now we're settling back in to our daily routine. When I planned this trip I originally had all kinds of good intentions for making busy bags and learning activities to make the time pass like these magnetic puzzles or these fun marble maze bags.
But when it came right down to it, after all the packing and last minute errands I only ended up with about 15 minutes to spare for that kind of thing. I tried to make the most of it, and in the end, I think we got very good mileage (no pun intended) for the time and effort spent.
I Spy Treasure Bags
First, I brainstormed to come up with a list of things that we were likely to see on our trip but that weren't too common. Things like:
a moving train
a barn with a silo
horses
a suspension bridge
a car-carrying truck
45 speed limit sign
a school bus
something that said the word "Tennessee" on it
Then I did quick google image searches to find a picture for each item. I printed off a large size of each picture and pasted them onto lunch bags. I put treats inside of each bag.
I also cut and pasted all of the images in smaller version onto a single document. I gave one paper to each girl to refer to as she looked out the window. If she spotted one of the items she let us know and I found the bag with that picture on it. Inside of each bag was a set of surprise treats for everyone. Some of the bags had food treats (fruit leather, granola bars, etc). Other bags had little toys or books.
Since we were going to be on the road for almost three days straight, I waited until the second day to introduce the I Spy Bags. It took the girls longer to spot the items that I thought it might, which ended up being just fine. It spread the treats out over two days, and until the last item was spotted they always had something they could do.
I think they noticed a lot more scenery than they might have otherwise, and learned a few things along the way. (now they know what a suspension bridge is, for example!)
What other fun travel games or tips for road trips with kids have you tried or heard of lately? On our next road trip, little J will likely be old enough to get restless and we'll have THREE fidgety kids on our hands!
Friday, June 15, 2012
Sticker Resist T-Shirts
Ever since I discovered the fun sticker and tape resist art technique that bloggers like Putti Prapancha have featured, I've been giddy with all the possibilities. We've done thank you cards, and tape resist collages, and just yesterday we tried our hand at sticker resist t-shirts.
Michaels has been had some pretty decent t-shirt sales, and I bought up a bunch of them the other day. I got out our big pot of foam alphabet stickers and let the girls dig through to find the letters of their name. We made sure that the stickers were pressed on nice and firm and that the names were centered decently well.
Then I got out the acrylic and fabric paints we happened to have around the house (acrylic paint works just fine on fabric, by the way...the only real advantage of fabric paint is the softness and flexibility) and told the girls to dab on colors close to the foam stickers.
They needed to guidance (and help in little G's case) getting the paint into all the little corners and crevices, but we got there eventually.
Since the girls like using lots of paint, I let it dry for about 4 hours before I ventured to take off the stickers. I think next time, I would choose slightly larger alphabet stickers, but mostly, we were pretty happy with our t-shirts. I like how they look kind of like a celebration of children's arts and crafts.
Excuse the bed heads on our top picture; we were excited to try them on as soon as the girls got up this morning. :)
Tuesday, June 12, 2012
Sharpie Tie Dye Method: 10 Tips
The Sharpie Tie Dye method is not at all original to me. I've seen it around Pinterest a lot, and as far as I can tell the first person to do the sharpie tie dye method was Steve Spangler Science. But it was the first time for us, and we enjoyed the results so much I just have to share!
What worked well for us:
1. Use small cups and a rubber band that fits tightly.
2. Experiment with the different sharpie colors. Some bleed more than others. Some leave a more distinct line. (We found that our blue pens didn't bleed much, but the purple and yellow spread quite far)
3. Use a paintbrush to dab on the rubbing alcohol rather than a eye dropper . The color bleeding is easier to control if you use less alcohol. Only use rubbing alcohol that is 70% alcohol or higher.
4. Wait for the alcohol to dry almost completely before you remove the rubber band. If you remove it too soon the colors will bleed beyond the circle.
5. Pay attention to what colors are next to one another. Those colors will mix, and it is too easy to end up with ugly browns if you don't pay attention.
6. Leave lots of white space between colors.
7. Symmetry in the sharpie design makes for a more attractive circle.
8. Flower designs look especially pretty.
9. When you are done with one circle, start the next circle in a very different part of the fabric. If your rubber band cinches a circle that is still wet, it will mess up the design.
10. There is lots of patience and waiting required for this craft. Watch a movie at the same time so you don't get impatient!
Have you tried the sharpie tie dye method yet? What tips could you share? We'll probably be doing this again, and would love to have some new ideas.
Labels:
art,
crafts,
indoor activities,
older children,
young children
Sunday, June 10, 2012
Father's Day Mug for Kids to Make
So simple and exciting if true- but it made me wonder why anyone would bother to buy real ceramic pens if a sharpie works just as well.
With such a fun idea though and all the materials already in our house...definitely worth a try. First, I used a black sharpie to draw a bubble letter outline for "I Love Dad" on one side and a blank face on the other side of a plain white, ceramic cup. I baked it at 350 for 30 minutes, waited for it to cool and let my preschooler use our colored sharpies to decorate.
Back in the oven for another 30 minutes.
So what were the results from our little experiment?
1. The marker does not smudge when it is handled. It didn't even come off when we ran it through the dishwasher.
But-
2. If you work at it with your fingernail or with a rough sponge, you can get some of the marker to rub off. Rubbing alcohol erases it completely.
3. I imagine ceramic pens work better and don't rub off, but for a child-made mug for Daddy I think the sharpie is just fine!
I looked it up, and it does seem that sharpies are non-toxic, but since they are not manufactured for use on food items, I think playing it safe and keeping the pen marks out of the inside of the mug and away from the rim might be a good idea.
Looking for more Father's Day ideas?
Fill-in-the-blank Father's Day letter
10 Ideas for Building Memories on Father's Day
Daddy Banner
Labels:
crafts,
family,
gifts,
holidays,
young children
Wednesday, May 30, 2012
Sanity Savers: Plastic Straws
If you're pretty dead tired, and the kids are itching to do something fun, you might try putting your hair in an up-do and getting out the plastic straws. It kept my kids occupied for more than a half an hour while I lay there resting on the floor. :-)
Wednesday, May 23, 2012
Leaf Man Activity : A Book and a Craft for Lois Ehlert
I know we've done a successful project with the toddlers in my home school co-op group when I overhear them reminiscing about it together later on.
"Remember when we made leaf man?"
"Yeah. Mine was a leaf LADY!"
I overheard this conversation among them this past week, and I knew then that it had been a good activity.
The Book
Leaf Man was such a simple activity that I hadn't bothered to blog about it, but since it seems to have been a hit, I thought I should.
First, we read the book Leaf Man by Lois Ehlert. The story is pretty simple; not much happens, but the illustrations are the beautiful nature collages that Ehlert is known for. It seemed to capture the imagination of the toddlers well enough, at any rate.
The Craft
After story time, we went outside to collect nature materials to make our own little leaf men. Leaves, sticks, seed pods, lichen, and the like.
I cut out a basic gingerbread man shape out of brown paper and attached it to the end of a popsicle stick.
We talked with the children to help them arrange their nature materials on the gingerbread men and glue them down. Each little man was finished off with two plastic googly eyes.
After the glue dried they were all set to act out the story from the book or to make their own!
Thursday, May 3, 2012
Cinco de Mayo Crafts
Before we moved to Texas I don't think I even knew what Cinco de Mayo was. Now that we're here, we see signs of it everywhere. (If you live in Austin, you might want to check out 10 Free Family Friendly Cinco de Mayo Events for this year from Free Fun in Austin)
I figured doing a simple Mexican flag craft with the girls this year was a good opportunity to sneak in a little geography and history. We pointed to where Mexico is on the map and looked up the Mexican flag. (The girls love pointing out flags when we drive in the car; I'm pretty sure they'll be noticing some from Mexico in the next few days)
Here's how we made a festive Mexican flag drinking straw with kids:
1. Cut a green and a white straw into several pieces. Slit each piece down the side with a pair of scissors. (Don't look too closely at my picture. I didn't happen to have any white straws at the time; so I used a piece of ribbon for the white)
2. Slip several pieces of white and green onto a red straw.
3. Print two copies of a Mexican flag from your printer. Glue their backs together and use a piece of clear tape to attach to the straw 2/3 from the top.
4. To make your straw extra fancy, cut a small piece from another red straw. Cut fringes into each end of the piece with a pair of scissors. Slit the piece all along one side with a pair of scissors and slip on to the straw just above the flag.
If you are in the market for Cinco De Mayo crafts you might also take a look at the Mexican jumping bean craft I wrote about a couple of years ago. The template is provided as well as a video showing how it works. (It feels alive in your hand and is so fun to watch)
My friend Rebecca's over at Quirky Momma also has some fun ideas on celebrating Cinco De Mayo with kids!
Does your family celebrate Cinco de Mayo? I'd love to hear what kinds of things you do together!
Monday, April 30, 2012
Rainbow Hats from Egg Cartons
This really was kind of a ridiculous idea. I'm not really sure where it came from except that a lot of my blogging friends have been doing egg carton activities and rainbow activities lately. I made the connection that there are six colors in the rainbow, and that there are six eggs on each side of a carton, and decided we should make rainbow hats.
I cut a carton in half and removed the middle egg dividers. Each girl got to paint half of the carton with the colors of the rainbow.
After they had dried, I punched a hole in each end with a hole punch and tied a piece of ribbon to each hole. I tied the ribbons in a bow under each girls chin to make a little rainbow hat.
Something about the hats gave M the giggles.
Little G though stayed very pensive. She apparently takes her rainbows very seriously.
I was a little disappointed that the girls didn't play much with the hats after they tried them on the first time. Oh well, maybe they'll pick them up again in a week or so. Or maybe this is just one of my crazy ideas that was fun to make, but dies a quick death (I've definitely had those before)
Have you had any simple costume ideas lately?
Thursday, April 26, 2012
Dot-to-Dot Learning Activity
Yesterday, I decided to pick up a preschool workbook and work through a couple of pages with my 2 and 4 year old just to see what we've been missing. We do a fair number of academically oriented activities, (like playdough spelling, and post-it note words) but they tend to be a little more hands-on.
At the end of our workbook time, I mostly felt that we had not been missing out on much (for one thing- the kids spend half their time trying to figure out what the directions are asking them to do. It's not a bad thing to learn how to follow confusing directions, but it's not the main skill I'm trying to teach them right now)
The one thing we did really like were the dot-to-dot pages- especially the alphabet dot-to-dots. My two-year-old doesn't have enough coordination yet to draw the lines herself, but we were able to work out a system that was fun for her and a great little learning activity.
Here's what we did:
Me: Can you find the "a?"
G: (points)
Me: Good, what comes next?
G: "b"
Me: Can you find it?
G: (points)
Me: (draw line to "b" while both of us make the bbbbbb sound until I get there)
It was especially a good way to practice lowercase letter recognition and letter sounds. G watched in happy anticipation for the picture to "appear."
Here's a site with some printable alphabet dot-to-dots if you're like me and would like to do some dot-to-dots without having to buy a workbook full of the other stuff!
Do your kids like dot-to-dot pages? Have you found any fun or educational twists?
Tuesday, April 24, 2012
DIY Suncatchers with Clear Glue
I was thinking the other day about the Elmer's glue suncatchers my aunt used to make with my cousin when she little. I had been trying to think of something colorful and a little translucent we could make them with when I noticed some pretty and bright drinking straws at the grocery store.
Here's what we did:
First, we filled a yogurt container lid with clear Elmer's glue. You can use the regular opaque kind also, but it won't be perfectly clear when dry. (Even toddlers love squeezing the glue bottle)
Then we cut up the straws into little pieces. (Be prepared for the straw pieces to "jump" around when you cut them. )
You can arrange the straws in a design or just sprinkle them randomly. It will look prettiest if you fill as much of the lid as possible.
Set to dry. It will take several days, maybe even a week, to harden. Pull the suncatcher out of the plastic lid. It may curl a little after you take it out. If so, you can put it under a heavy book for a couple of hours to flatten it out.
Use a needle to push a piece of thread through the top of your suncatcher and attach to a suction hook so that you can hang it on a window. So pretty!
For another drinking straw activity, try using them with playdough!

Labels:
crafts,
indoor activities,
older children,
toddlers,
young children
Subscribe to:
Posts (Atom)