Showing posts with label nature. Show all posts

Monday, December 3, 2012

Thankgiving Banner: Fall Leaves

I'm woefully, woefully behind in posting, but I wanted to post about our Thanksgiving craft before it was actually Christmas. Since there was a lot going on this year, we didn't do our traditional sign with found items from nature like we have done for the previous four Thanksgivings.

 We did make a decorative banner using the pretty fall maple leaves my mother sent in the mail from Michigan. Just sharpie writing on each leaf and stuck to a couple of pieces of twine. Simple- and I think we will keep it in storage and see how it looks next fall.

I know it is a little late, but I hope you all had a lovely Thanksgiving!

Wednesday, November 14, 2012

Leaf Printing for Fall

Before Fall slipped away entirely I wanted to share this project I did with my girls a while back.  Leaf printing on paper is an idea I found in MaryAnn Kohl's fun book Scribble Art.  She recommends using thin paper, but since all my paper was thick and stiff, I decided to try using some old muslin I had left over from another project.

I liked the earthy way the muslin looks behind the prints.  I used watercolor paint because I don't have an intention of washing it, but I think fabric paint would work as well.

Here are some tips I found for making good prints:

- Use sturdy, durable leaves with pronounced veins.  I used white oak.
- Make sure the paint covers the leaf entirely but is not too thick or globby
- Press down the fabric on top of the leaf (instead of the other way around)
- The second print is often the nicest; so try blotting on scrap fabric before printing on the fabric you hope to use

M has been wanting to learn to sew lately; so I think we may turn these into some simple, small pillows.

For more fall project ideas for places without "real" fall leaves see our Fall Stained Glass craft, and painted toast leaves.


Wednesday, October 24, 2012

Time to Putter

I was reminded of the importance of puttering time at home this Saturday morning when we were all wandering around lazily (R and I still in our pajamas).  I was feeling just a tad bit guilty for not planning something and making better use of our precious family time when I spotted something on the window.  It was a big green bug clinging there (from the outside)
Everybody gathered around and got a chance to examine this beautiful creature "safely" and up close. We all   seemed to notice something different- from his sticky feet to his interestingly scaled underbelly.  It was a gentle and enjoyable time, and it struck me again how that family togetherness often happens best organically.

I was glad we puttered that morning.

Friday, June 29, 2012

Watercolor Painting on Sand Dollars

Did you know that painting with watercolors on sand dollars produces a really neat effect?  I didn't until the other day when my kids and I spent a morning painting.

Lately, I've tried to maximize our fun to clean-up ratio by saving  messy art for times when we have two or three full hours to devote to the fun.  So, the other day, I covered our kitchen table with a drop cloth and we spent the morning finding everything and anything our imaginations could think of to paint on and with.

That happened to include a couple of large sand dollars that I had saved in my craft cabinet, waiting for a good use. (Unfortunately, success stories in this department encourage me to keep my craft cabinet full to the BRIM)

The super absorbency of sand dollars means that they soak up the paint, and the color spreads across the shell like magic.  (If you do this, make sure you use lots of water with your paint.  A dry watercolor brush doesn't do much at all)

It's hard to improve upon God's creation.  The sand dollar was probably actually prettier in it's original pure white form, but I think these are lovely in their own way as well.


I got my sand dollars at a garage sale, but I discovered recently that you can also buy sand dollars on Amazon.

(that's my affiliate link)

Wednesday, May 23, 2012

Leaf Man Activity : A Book and a Craft for Lois Ehlert

I know we've done a successful project with the toddlers in my home school co-op group when I overhear them reminiscing about it together later on.
  "Remember when we made leaf man?"
"Yeah.  Mine was a leaf LADY!"
 I overheard this conversation among them this past week, and I knew then that it had been a good activity.

The Book
 Leaf Man was such a simple activity that I hadn't bothered to blog about it, but since it seems to have been a hit, I thought I should.
First, we read the book Leaf Man by Lois Ehlert.  The story is pretty simple; not much happens, but the illustrations are the beautiful nature collages that Ehlert is known for.  It seemed to capture the imagination of the toddlers well enough, at any rate.

The Craft
After story time, we went outside to collect nature materials to make our own little leaf men.  Leaves, sticks, seed pods, lichen, and the like.
I cut out a basic gingerbread man shape out of brown paper and attached it to the end of a popsicle stick.
We talked with the children to help them arrange their nature materials on the gingerbread men and glue them down.  Each little man was finished off with two plastic googly eyes.
After the glue dried they were all set to act out the story from the book or to make their own!


Friday, March 30, 2012

Nocturnal Animals Project: Watercolor Resist

For our Five-in-a-row homeschool co-op recently we read the book Owl Moon.  One of  our conversation topics afterward was the concept of nocturnal and diurnal animals.  My husband suggested that we also talk about the special reflective eyes that God gave night animals.  Nova has a good article describing the science of a nocturnal animal's eyes.  

I was really tickled to find this lightning bug project from Toddler Approved that provided the inspiration for our art project.  For our co-op project I:
1  Printed off a page of nocturnal animal pictures I found on the internet.  
2.  Gave each child a yellow crayon to color in the animals' eyes (Coloring around the eyes a little is a good idea to make them stand out better) and the word "nocturnal."
3.  Allowed the children to paint over the whole picture with dark watercolors.  The yellow crayon resists the paint and makes the eyes pop out.  


learning laboratory at mama smiles

Saturday, March 17, 2012

Happy St. Patrick's Day: and a Shamrock Window Craft

For days I've been trying to think of something to do with the clover we pressed in an old book last week.  My first thought was to use it to decorate pretty little glycerin soaps, but we never made it to the craft store to buy the glycerin.

Finally, yesterday I decided we would make shamrock sun catchers.  I'm happy we did; today we have cheery little shamrocks hanging on our front windows, plus the craft was easy and enjoyable (and cheaper than buying the soap).

Friday, March 9, 2012

Patterns in Nature: a Book and a Craft

I've often enjoyed how the patterns and shapes in nature mirror one another.  That's the idea behind the beautiful picture book Shapes and Patterns in the Natural World. 

Wednesday, March 7, 2012

5 Lessons from the Mud Pit

Our poor backyard did not fare well in the drought here in Texas last summer. Most of the time these days,  it is a dust bowl with tiny bits of brown straw peeking up here and there.  When it rains, however, or when a little girl turns on the hose, we have a giant MUD PIT on our hands.

Friday, March 2, 2012

Pressing Clover for St. Patrick's Day

It was a gorgeous morning here in Austin; so the girls and I headed out to our front yard to pick clover leaves and pressed them in an old book.  We'll be using them to make a St. Patrick's Day craft soon.

Monday, December 26, 2011

Borax Crystal Snowflakes

We've got at least a couple of months of winter left with no Christmas cheeriness to brighten the gray days.  And here in Texas, we don't even have pretty snowflakes to cheer us (we DO have mild enough weather to play outside easily- for which I am very thankful!)

So...it's time to start hunting down winter snow crafts.  There really are a lot of amazing ones out there (maybe because people are indoors, trying to chase away the post-holiday blues??)

This borax crystal snowflake craft is really worth doing if you've never done it before. I had seen it around the internet on several blogs, but pictures don't really do justice to the beautiful, dramatic results.

Materials:

Mason jar
String
A pencil
Borax (in the laundry section of the grocery store)
Boiling Water
Blue pipe cleaners
Scissors

1.  Cut 2 pipe cleaners into small pieces and fashion into a snowflake shape by twisting the pieces around one another.
2.  Fill a mason jar with boiling water and dump in some borax.  (Directions I've read say 3 Tablespoons per one cup of water, but it's really not fussy at all).
3.  Stir until it stops dissolving.  (It's ok if some of the borax just settles to the bottom)
4.  Tie a string on the pipe cleaner snowflake.  On the other end of the string tie a pencil (to keep the snowflake from falling to the bottom of the jar)
5.  Dip snowflake in the mason jar, making sure it does not touch the bottom or sides of the jar.  Wait for two or three hours and pull out your pretty snowflake!

If your children are old enough you can use this craft to illustrate the science of supersaturation.  If they are little tots like mine, they'll just enjoy helping to stir the borax mixture and then admiring the way the sun shines through the crystals at the end.  (They look really nice hung on windows!)


Tuesday, November 29, 2011

Flower Patterns

When a bouquet starts going south, get a little educational enjoyment out of it by lining up patterns of flowers. Let your child discern the patterns and place the next few flowers in each row.


Tuesday, November 8, 2011

Three Art Mediums for Three Types of Clouds

1.  Cirrus - white chalk
2.  Stratus- thick gray paint
3.  Cumulus- equal parts shaving cream and glue.  It dries fluffy and textured- really fun!
     (for cumulonimbus- add a little black paint)

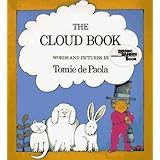
We did this as a go-along activity for Mr. Gumpy's Motorcar and The Cloud Book today in our homeschool co-op.  I liked that it worked for our wide age range  (3 year olds through six year olds)

Friday, October 21, 2011

Fall Leaf Puzzles


As our first project with our wonderful surprise leaves we made some fall leaf puzzles.

We took Maryanne's (Mama Smiles) suggestion of covering the leaves with Mod Podge for the sake of longevity, and also to make them less brittle.  It worked great, and also gave them a pretty shininess.

I  cut each leaf in half and gave M and G turns at putting them back together.  It really was more of a four-year-old kind of puzzle than a 2-year-old puzzle.  (G wasn't as sure when she actually had the leaf together correctly and needed a lot of help)

Monday, September 26, 2011

Butterfly Symmetry Matching Game


So many different kinds of matching games to do with little ones!  We were inspired to do this symmetry butterfly matching game by a post from Mama Jenn.  It was a hit!


We used magnets and folded the wings up a little (pretty and it helped them all fit on the metal tray)  Mama Jenn made hers lap book style in a file folder and used velcro.  

Learning Laboratory!

Wednesday, September 21, 2011

Ordering Seashells

M and I did this as a winding- down activity right before rest time.

At first, she was overwhelmed by the idea of having to order the shells largest to smallest, but when we did it one step at a time, "Which one is biggest?...ok, now which one is biggest?" it took on a sort of soothing rhythm.
 

(Matching the backs to see which shell is larger.)

Wednesday, August 31, 2011

Working on My Bad Attitude and M's Fine Motor Skills- Seeds!

I have to admit that I've had a pretty rotten attitude toward the outdoors lately.  We've had the hottest summer on record for Texas and we're in the middle of one of the worst droughts as well.

I felt a little convicted though the other day when I was reading Wendell Berry, and he was describing the kind of people who claim to love nature but really only pay attention to the parts that are uniquely beautiful (the mountains of the Grand Canyon, dramatic waterfalls, etc).  It's a kind of nature sensationalism.  Berry believes that the best kind of nature lover is the one with affection for the land they live on- regardless of its lack of unique attractions.

His words rang true to me; so I decided to work on loving my parched little land.  Today we took a walk in the "green" space behind our backyard and challenged ourselves to try to find as many beautiful and interesting things as we could.  The girls carried little baskets for their treasures.

The first glimpse out the back gate was pretty dreary...
Even the cacti are having trouble.
We came to a beautiful oasis of green and then realized that it used to be the retention pond!
But...we did find some treasures. 
 M and I enjoyed looking at the intricate details of the dry grasses and lichen with a magnifying glass back home.
  
I had M work on isolating single a single seed from each grass cluster.   She focused on her task and enjoyed the challenge.  Some seeds were pretty tiny!
This was my favorite:


Monday, August 22, 2011

Okra Flower Printing


Okra is one of the few crops that seems to be thriving in this part of the world these days.  (rotten Texas drought this summer).  We bought some at the farmer's market and enjoyed part of them fried with cornmeal.  Then today had fun using it to print floral wrapping paper.


We discovered that the flowers show best if you don't use too much paint and you press down firmly, and that it's also pretty to mix colors.