Showing posts with label indoor activities. Show all posts

Sunday, May 22, 2016

Succulents in Seashells: Kid's Craft

I never used to care much for succulents.  Deciduous leaves and lots of flowers just seemed more alive.  Ever since moving to drought-ridden Texas though, where dry weather plants reign, succulents have really grown on me. 

 Or maybe it's just because they have become trendy, and I'm more of malleable to popular opinion than I like to think.  

At any rate, they really are great, aren't they?  So many textures. So many fun names.  (baby toes!) So un-plant-like sometimes.  Not to mention the fact that they're adorably juicy...it makes you just want to squeeze their little leaves!  

Wednesday, May 11, 2016

Eliza's Cherry Trees: a Cotton Candy Craft

If you've ever been captivated by a flowering tree in the spring or wondered how the cherry trees ended up in Washinton D.C. you should run to go find this wonderful book.

Wednesday, February 12, 2014

Doily Heart Stencil T-Shirts

I saw this Valentine's Day kids craft idea last year in Family Fun magazine, but we didn't get around to it in time.  That turned out for the best though because this year the girls had an opportunity to do it with their grandmother, and now they all have coordinating shirts they can wear together on Valentine's Day.
Here are some tips we found for making this project go smoothly with kids:

Thursday, January 23, 2014

Heart Shaped Granola Bars {Healthy Valentines Treats}

You know what I recommend?  Trial runs for homemade Valentines Day treats!  Ha ha...why not- right?  We did that the other day with these heart-shaped granola bars as I wasn't sure how granola dough would work with cookie cutters.  I'm happy to report that it works just fine (said through tasty granola crumbs).

I vote for making these above actual heart-shaped sugar cookies for the following reasons:

Friday, October 25, 2013

Stained Glass: Kids Medieval Project

When I visited Europe as a child, I remember being struck by the Gothic stained glass windows, and particularly the rose windows found in so many cathedrals- for their symmetry and massive scale.  So this year as we've been homeschooling through the Middle Ages, I found myself wanting to help my children interact a little with the beauty of Gothic stained glass somehow.  

I liked the way this project allowed my children to do their own work but create pieces that were unique and presentable.  I had envisioned helping them a great deal, but found that the the art mediums at both stages of the project were very forgiving.  My six-year-old and four-year-old made their windows almost entirely on their own. I think an older child could include finer detail and could maybe be more creative with the project.

Materials:

Glass rectangle from a small picture frame 
Black fabric puffy paint with a fine tip
Acrylic paints
Clear liquid glue

Friday, March 15, 2013

My Kids Love it When I do Laundry!

Yes, my girls get pretty happy when they see me with a basket of clean laundry.  Do they care that much about clean socks and underwear?  They couldn't care less!  What they love is the prospect of being showered with piles and piles of clean clothes.  (It's especially great if I am on the ball about getting it out of the dryer in time, and the clothes are nice and warm)

And why not?  It all needs to be folded and sorted anyway.  They sit close together and wait for me to dump it all on their heads.  Lots of giggles.  No creativity, time or clean-up required on my part.  Perfect.

This post is inspired by my friend Rebekah at The Golden Gleam who writes a fun series called Joy in Minutes with lots of easy, simple ways to bring joy to your family.

Sunday, February 24, 2013

Blue Glue Batik

I tried this activity from Pink and Green Mama with preschoolers, and it was fun, but I think it would be a fabulous technique to try with older elementary-aged children.  It is important to use blue gel glue.  I tried it with both the typical white opaque and the clear gel with less than satisfactory results.  They both run while they are wet and shrink so much in the drying process that the lines turn into dots.

Wednesday, February 13, 2013

Potato Stamp Valentines


A while back, my mother-in-law suggested I try potato stamping with the girls.  It took me a while to get around to doing it, but now that we've done it, I wish we'd tried it sooner.  There's just something FUN about using food to do art.  (e.g. we liked stamping with okra and making magnets with colored pasta)

Getting the right shape in the potato can be a bit tricky.  I found that it worked best to:

Wednesday, November 14, 2012

Leaf Printing for Fall

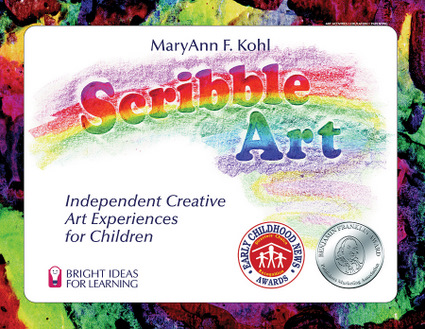
Before Fall slipped away entirely I wanted to share this project I did with my girls a while back.  Leaf printing on paper is an idea I found in MaryAnn Kohl's fun book Scribble Art.  She recommends using thin paper, but since all my paper was thick and stiff, I decided to try using some old muslin I had left over from another project.

I liked the earthy way the muslin looks behind the prints.  I used watercolor paint because I don't have an intention of washing it, but I think fabric paint would work as well.

Here are some tips I found for making good prints:

- Use sturdy, durable leaves with pronounced veins.  I used white oak.
- Make sure the paint covers the leaf entirely but is not too thick or globby
- Press down the fabric on top of the leaf (instead of the other way around)
- The second print is often the nicest; so try blotting on scrap fabric before printing on the fabric you hope to use

M has been wanting to learn to sew lately; so I think we may turn these into some simple, small pillows.

For more fall project ideas for places without "real" fall leaves see our Fall Stained Glass craft, and painted toast leaves.


Monday, October 29, 2012

Letter H Craft: Hotdogs

This year I'm the nursery coordinator for our chapter of our homeschool co-op, Classical Conversations. Part of that job involves coming up with simple "Letter Crafts" for each week. I haven't posted about them so far because for the most part, I have been using other people's ideas.
(like this cute little apple tree craft that I found at Learn, Create, Love)

For letter "H" though we made a hot dog craft that I came up with, and since the kids got a kick out of it, I thought I would share.  I made an easy template for the bun and hot dog and cut copies out of card stock and construction paper to be glued together.  Then the kids glued on pieces of yellow and red yarn for the condiments and bent the sides of the bun upward to look like a real hot dog.
Pretend food is the best!


Wednesday, October 24, 2012

Time to Putter

I was reminded of the importance of puttering time at home this Saturday morning when we were all wandering around lazily (R and I still in our pajamas).  I was feeling just a tad bit guilty for not planning something and making better use of our precious family time when I spotted something on the window.  It was a big green bug clinging there (from the outside)
Everybody gathered around and got a chance to examine this beautiful creature "safely" and up close. We all   seemed to notice something different- from his sticky feet to his interestingly scaled underbelly.  It was a gentle and enjoyable time, and it struck me again how that family togetherness often happens best organically.

I was glad we puttered that morning.

Thursday, September 20, 2012

MaryAnn F. Kohl: Art with Young Children and a Giveaway

It's a treat to be able to interview someone you admire who is an expert in a field you care about.  That's why, even though this is a busy season in my life, I couldn't pass up the opportunity to interview MaryAnn F. Kohl, author of over 20 award-winning books about children's art and a contributor to Family Fun magazine (among many other distinctions).

MaryAnn recently sent me a copy of Scribble Art to review, and the girls and I have been having a ball trying out the activities there.  So far, we've done salt painting, made an easy piñata, and tried tissue paper collages (my favorite so far!)

The thing I love about MaryAnn's books is her obvious and genuine care for children.  It is tempting as a parent or a teacher to gravitate toward art projects that "turn out well," with end-products that make adults feel that the time has been worthwhile.  MaryAnn, on the other hand,  sees art from the perspective of a child and knows that it is the creative exploration that is often very special to children. That's why in Scribble Art, you'll find oodles of ideas for open-ended art experiences.

Who knew that there were so many possibilities for art mediums and canvases around the house?  Liquid starch, flour, sawdust- even insulated telephone cable find their way into over 100 activities that children can do independently for the sake of fun and beauty.

I'm finding it can be a great boon to have this arsenal of fun lying about the house, by the way.  The other day, as I was making dinner and needed to work uninterrupted, I found the tissue paper collages to do the trick nicely!

So let's turn now to MaryAnn and hear her perspective on doing art with young children.


1.  Can you tell us a little about the role art has played in your own life personally, both as a child and an adult?
When I was little, I was constantly coloring in coloring books and on blank paper, and at times, on the walls. My mom provided me with scissors, glue, paper, and wonderful crayons all at my reach on a shelf we called the coloring shelf. As I grew, I had some talent with drawing, though I was never super talented, but I enjoyed it enough that I was often complimented on my work. This encouraged me to volunteer to do covers for classroom books or decorate invitations for the Halloween Party. When I began teaching, I found that even the most rowdy child would quiet down and become focused when doing art, and by art, I mean actually creating unique work with materials on hand, not copying something I the teacher had made. So I made sure art was a big part of everything we did. When I had my own kids, art was important from the beginning. Playdough, painting, coloring, and collage were a constant for my kids. They are both very good at art now, and though I don't think it is because of all the activities we had specifically, I do believe that their creativity was honored which has inspired them to go forward in life with that ability.


2.  Each of your books makes a unique contribution.  What about Scribble Art do you especially like?

Scribble Art was the first book I wrote, and has sentimental connections back to my teaching years where all these ideas were tested with kindergarten through grade three children, children I knew and loved. I choose these projects because they were open-ended and I was so excited to write a book to encourage creativity for children where their own unique artwork rather than copying adult made cutesy projects. The book was published in 1985 and it is still my favorite and still selling well around the world (in 9 languages no less).

3.  What tips would you give parents for doing art with very young children?
Start small! Rather than putting out jars of paint for a painting project, start with some shallow jar lids filled with about 1/8" of paint, perhaps three colors tops. Use small brushes or cotton buds for beginning. On the other hand, using big brushes and a bucket of water outdoors will paint thousands of rocks and squares in a sidewalk. Big or small, messy or tidy, start with fewer materials in the beginning, and add more in as the children become adept at using them and learn to handle the wonder of it all.

4. As a mother, I often feel my blood pressure rise when art starts to get messy because I envision myself spending the rest of the day cleaning it up.  I would love to hear about how you dealt with the tension between creative art and cleaning up messes when you were a parent of young children.
Do messy type art on days you are ready to handle it. Otherwise, skip it for the time being. The smartest thing is to set up the art area ahead of time to catch the mess. For example, tape an old shower curtain to the floor or over a wall near their little work table, or keep a damp sponge on their work area for them to wipe their fingers; wear a fitted apron or cover rather than a big shirt with rolled up sleeves that get in the way. Plan ahead to prevent problems. Sometimes I put a loop of masking tape on the bottom of a paint cup so it won't tip over, or certainly only fill it half way, not to the brim. Ideas like this make things easier. And if possible, working outdoors is always nice and much easier to clean up. Encourage the kids to help with the clean up too. Part of being a child and being given wonderful experiences is to participate in setting up, mixing, cleaning up, etc. They love to wash the tables with a big soapy sponge!


5.  Would you also give us some tips on doing open-ended art with young children in a group setting?
I like to place materials on the center of a table that everyone can gather 'round together (usually no more than 6 at the table at a time). Everyone can reach in and use what is available, and everyone cleans up their own mess. I rarely show them any finished product they should be trying to achieve; I would rather just see what they do with the materials. Most materials shout out how they should be used, so you don't have to say much. For example, if you have contact paper peeled away and sticky, and there are cotton balls and scraps of paper on the table, the kids will automatically stick the cotton balls and scraps to the sticky background. Let the materials you choose dictate how the activity will go. Sometimes you need to give a little demo or a brief explanation so they aren't left completely in the dark with new or unusual materials. But try not to make a sampale for them to copy, because they will copy it, and at that point, the whole purpose of creativity and unique thinking has gone out the window.

6.  Which of your books / activities do you especially recommend for the youngest crowd?  (2 to 5 year olds)
Preschool Art is the best book for the 2-5 year old group, but it costs more than Scribble Art, and Scribble Art would do very well for that group too. My website also offers reduced price eBooks, which is another option.


7.  Is there anything else you would like to add?
I would love for everyone who is interested to join my mailing list. I send out a very nice newsletter once a month called the ArtsyKidsNEWS, with four or five art projects that go well with that particular month. Halloween/Autumn/Harvest is coming up soon and will be sent by email, free of course, at the end of September. Each month one person wins a free art book! Sign up on my website, home page, lower right corner:
I'd love for your readers to visit my Facebook page too. 
Go here:
or go here:

MaryAnn has such a gentle touch in her thinking about children and mothering.  Wouldn't you loved to have had her for a teacher (or a mom-coach :)?  To hear more of MaryAnn's kind voice take a look at the beautiful interview that Tinkerlab did recently.

*********************************************************************************
MaryAnn has graciously offered to give a copy of her book Mudworks (the bilingual edition) to one reader here at Having Fun at Home. To be entered in the giveaway, take a look at MaryAnn's website Brightring  and leave a comment on this post about something you saw there.  (make sure to leave an email address so I can contact you if you win)

For additional entries,
1) Like MaryAnn's Facebook page.
2) Like Having Fun at Home's Facebook page

Leave an extra comment for each of the above.

The giveaway will close at midnight on October 1st.  At that time I will chose a winner using Random.org

Update: Giveaway closed.  Winner is #21 Jennifer!  


Sunday, September 9, 2012

Rainbow Fish Birthday Party

I'll grant that "Rainbow Fish" is a bit random for a  party theme, but it was the best way I could see to combine the odd assortment of  things we thought up for my daughters's joint birthday party.
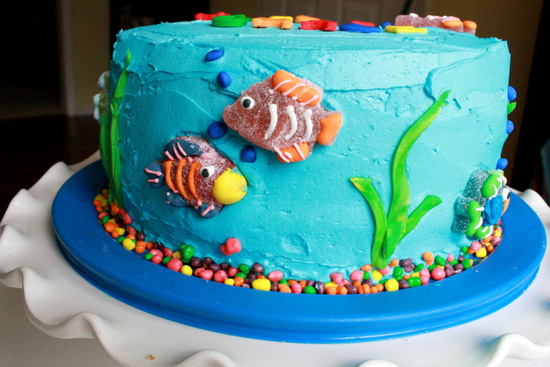
Things like this super easy but fun aquarium cake (inspired by Cakes and Cukes)

an Ocean Punchbowl (once upon the time there were fish in there, but they sank and were never seen again).
Rainbow bell peppers and dip (and of course, Pepperidge Farms rainbow goldfish fit right in there; so we had to have those as well)

Fish Straws (these gummy fish worked great for the cake and straws)
Rainbow doorways (If you've been following me for a while you'll remember our jumping through a rainbow day)
A bubble pond
Underwater artwork decorations.  Each guest to the party drew a picture of fish or an underwater creature to give to my daughters in lieu of presents (no more toys!! :)
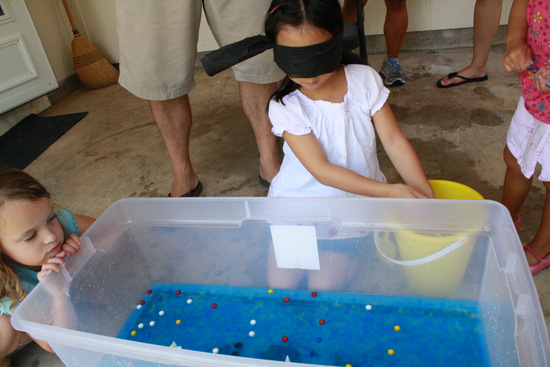
Fishing game with waterbeads and marbles (more about this later)
Fishing hats for coloring party favors.  I traced the fish onto each hat using the easy method I wrote about this summer.  The googly eyes were affixed with Jewel It glue.  Each guest got to color their fish with regular markers.  Every time they go through the wash, the hats can be colored all over again.
I'm really a fan of using hats as party favors, by the way.  It makes for such a cute group picture to commemorate the party.
and my personal favorite, rainbow streamers on the ceiling fans.  The picture doesn't do justice to how fun it is to stand in the middle of a rainbow swirling all around you.  (Just be careful where and how you affix the streamers or it quickly becomes a tangled mess!)
*Post contains affiliate links

Tuesday, September 4, 2012

Musical Golf Clubs

Can you tell what this is? It's two little girls with golf clubs connected by a nylon loop "scarf" twirling and dancing around the room to world folk songs. It has become a daily ritual around our house these days and lasts for almost an hour every time.
This activity certainly beats out any activity I've ever planned.  Kids know how to make fun (and exercise!)
(Pay no attention to the basket of laundry in the corner...you'd think with the kids entertaining themselves this well, I'd have time to put away a little laundry!)

Friday, June 15, 2012

Sticker Resist T-Shirts

Ever since I discovered the fun sticker and tape resist art technique that bloggers like Putti  Prapancha have featured, I've been giddy with all the possibilities.  We've done thank you cards, and tape resist collages, and just yesterday we tried our hand at sticker resist t-shirts.

Michaels has been had some pretty decent t-shirt sales, and I bought up a bunch of them the other day.  I got out our big pot of foam alphabet stickers and let the girls dig through to find the letters of their name.  We made sure that the stickers were pressed on nice and firm and that the names were centered decently well.

Then I got out the acrylic and fabric paints we happened to have around the house (acrylic paint works just fine on fabric, by the way...the only real advantage of fabric paint is the softness and flexibility) and told the girls to dab on colors close to the foam stickers.
They needed to guidance (and help in little G's case) getting the paint into all the little corners and crevices, but we got there eventually.

Since the girls like using lots of paint, I let it dry for about 4 hours before I ventured to take off the stickers.  I think next time, I would choose slightly larger alphabet stickers, but mostly, we were pretty happy with our t-shirts.  I like how they look kind of like a celebration of children's arts and crafts.
Excuse the bed heads on our top picture; we were excited to try them on as soon as the girls got up this morning. :)


Tuesday, June 12, 2012

Sharpie Tie Dye Method: 10 Tips

The Sharpie Tie Dye method is not at all original to me.  I've seen it around Pinterest a lot, and as far as I can tell the first person to do the sharpie tie dye method was Steve Spangler Science. But it was the first time for us, and we enjoyed the results so much I just have to share!


What worked well for us:

1.  Use small cups and a rubber band that fits tightly.
2.  Experiment with the different sharpie colors.  Some bleed more than others.  Some leave a more distinct line.  (We found that our blue pens didn't bleed much, but the purple and yellow spread quite far)
3.  Use a paintbrush to dab on the rubbing alcohol rather than a eye dropper .  The color bleeding is easier to control if you use less alcohol.  Only use rubbing alcohol that is 70% alcohol or higher.
4.  Wait for the alcohol to dry almost completely before you remove the rubber band.  If you remove it too soon the colors will bleed beyond the circle.
5.  Pay attention to what colors are next to one another.  Those colors will mix, and it is too easy to end up with ugly browns if you don't pay attention.
6.  Leave lots of white space between colors.
7.  Symmetry in the sharpie design makes for a more attractive circle.
8.  Flower designs look especially pretty.
9.  When you are done with one circle, start the next circle in a very different part of the fabric.  If your rubber band cinches a circle that is still wet, it will mess up the design.
10.  There is lots of patience and waiting required for this craft.  Watch a movie at the same time so you don't get impatient!


Have you tried the sharpie tie dye method yet?  What tips could you share?  We'll probably be doing this again, and would love to have some new ideas.  


Monday, June 4, 2012

Using Rubber Stamps on Cookie Dough

The following is another example of something that is generally a flop can sometimes still produce deceivingly decent pictures.  Inspired by Martha Stewart, we tried using our rubber stamp collection on cookie dough the other day.  We washed off the stamps, made up a batch of shortbread dough (because I had read that it puffs up the least in the oven), and experimented a little bit.

This is what we learned:

- deeper, simpler stamps are better
- you don't want to press down too hard because then the corners of the stamp show up
- you don't want to press too lightly because then the outline of the picture is indiscernible
- even when you are as careful as possible, the picture often fades away in the oven.  Only about a third of ours turned out.

I love that the girls were completely unaware of its having been an aesthetic flop. To them, it was just like playing with sweet playdoh.  They especially liked using our pawprint stamps on the doh, and they enjoyed painting the cookies afterward with diluted food dye.